X Marks the Scot - An on-line community of kilt wearers.

   X Marks Partners - (Go to the Partners Dedicated Forums )
USA Kilts website Celtic Croft website Celtic Corner website Houston Kiltmakers

User Tag List

Results 1 to 10 of 51

Hybrid View

  1. #1
    Join Date
    25th September 04
    Location
    Victoria, BC, Canada 1123.6536.5321
    Posts
    4,794
    Mentioned
    3 Post(s)
    Tagged
    0 Thread(s)
    The next problem my mind just could not get around was the way "The Art of Kiltmaking" explains was how to figure out how wide your pleats needed to be. You need to measure the Sett size and know how many Setts of fabric you had to work with, and how big the hips of the kilt you were making was.

    To me, who was already used to using a standard pleat width, it just comes as second nature to figure out pleat size based only on the Sett size of the particular Tartan I was working with.

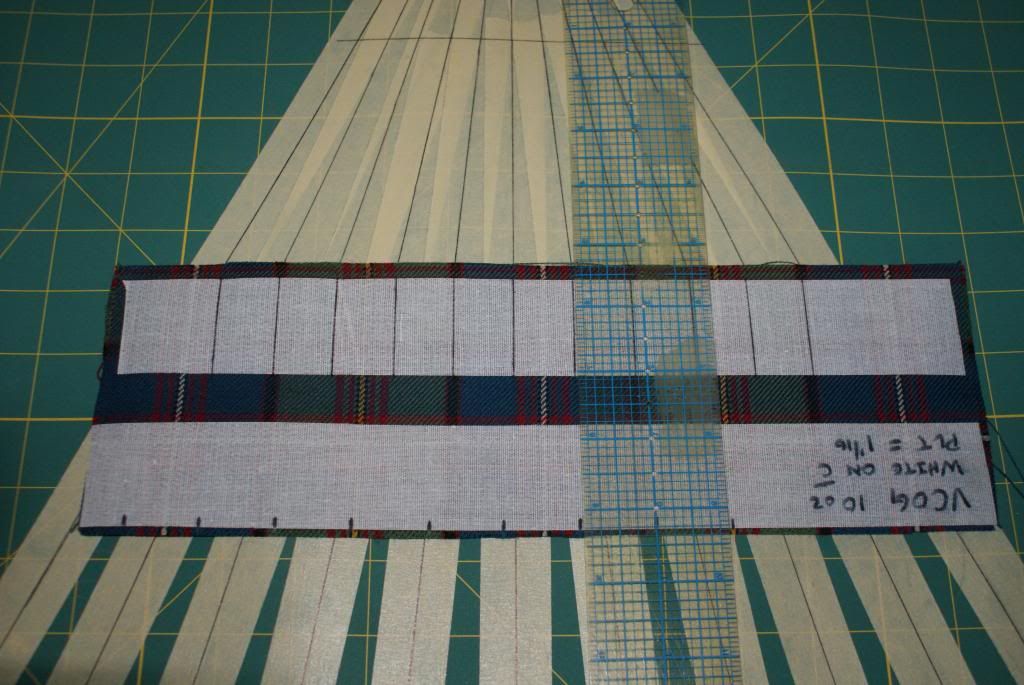
    Remember those lines you made on the table in the first step of this tutorial? Here they are again.


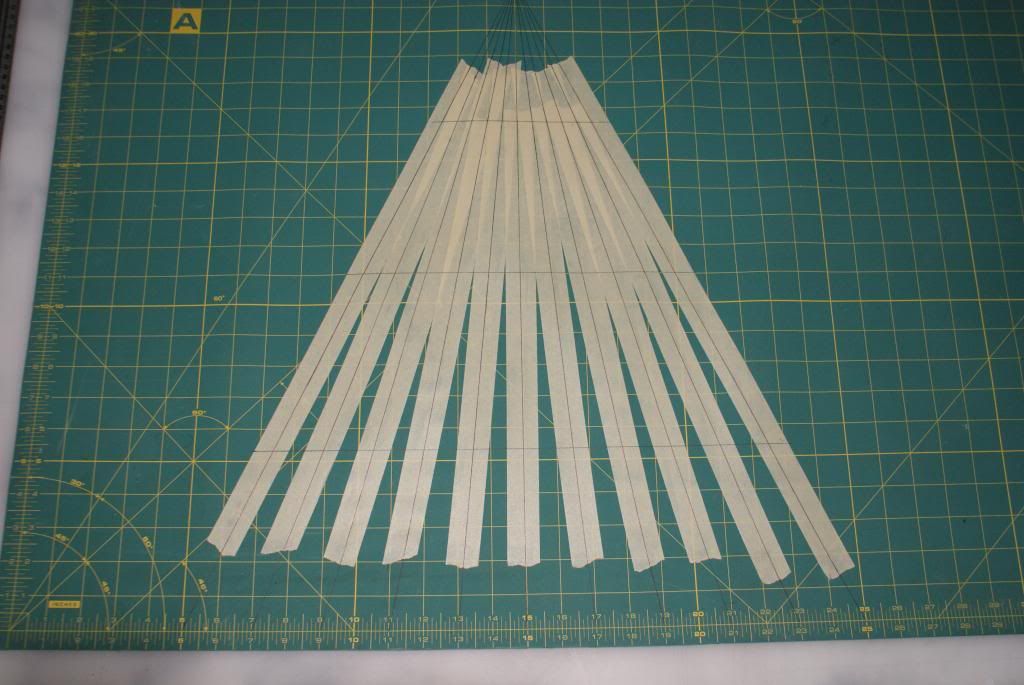
    Can you see up near the top a horizontal line drawn? There is another near the middle and another down at the bottom. These lines are my pleat width limit lines. the horizontal line near the top tells me where the spacing is 1/2 inch apart. The horizontal line in the middle is where the spacing is exactly 1 inch apart, and the horizontal line near the bottom shows where the spacing is 1 1/4 inch apart.
    This spacing is about the standard pleat width in a traditional kilt. Some kilts have pleats as narrow as 5/8 inch and some as wide as 1 1/4 inch. So the top and bottom horizontal lines are about as narrow or as wide as I want my pleats.

    All you have to do to figure out pleat width is to lay your Tartan down on the lines. Then move the strip of fabric up and down till the Tartan aligns with the lines on the table.

    Viola!!!

    Well, not quite as simple as that, but almost. And here is where knowing a just a bit about Tartan and tapering your pleats comes in.

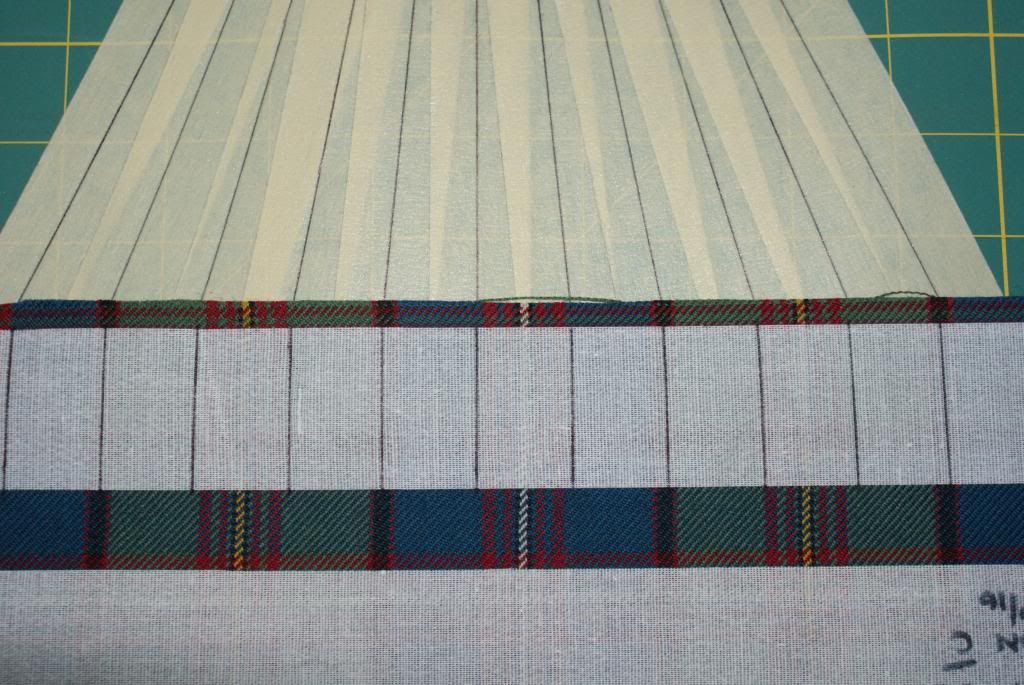
    Here is my strip of Tartan laid out on the lines.


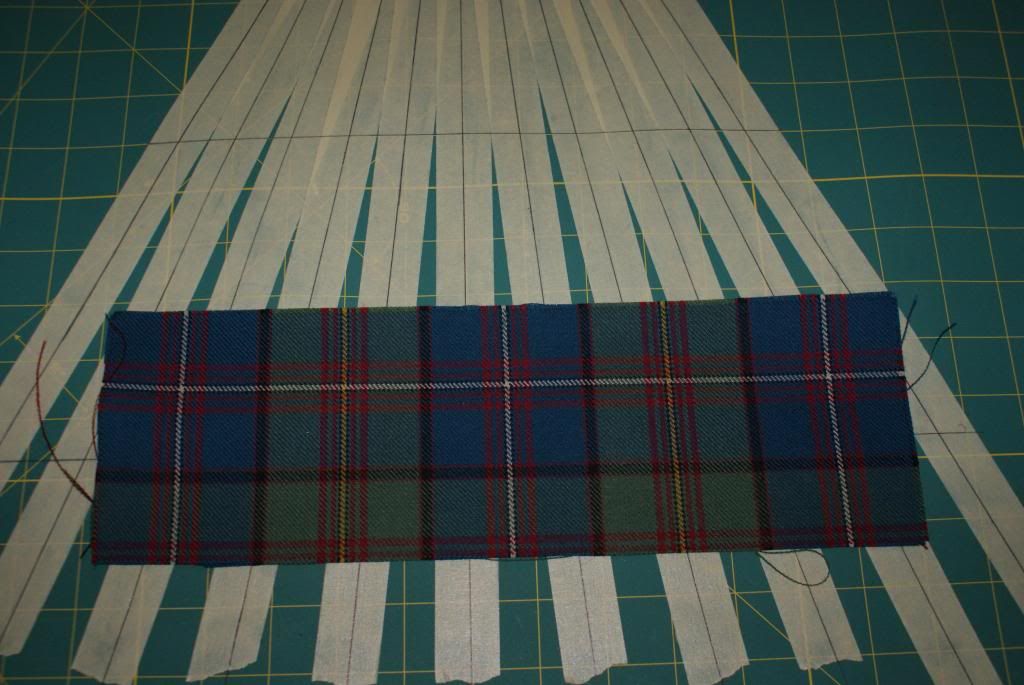
    Can you see that I have moved the strip up and down until the Tartan pattern is aligned with the lines. Look closely at the small yellow and white lines in the Tartan. Can you see how each is in the center of the grid lines?

    Now notice how wide each grid line is at this point on the grid. The spacing at this point on the grid is about 1 1/4 inch. Probably too wide for this Tartan and a traditional looking kilt.

    Now look again.


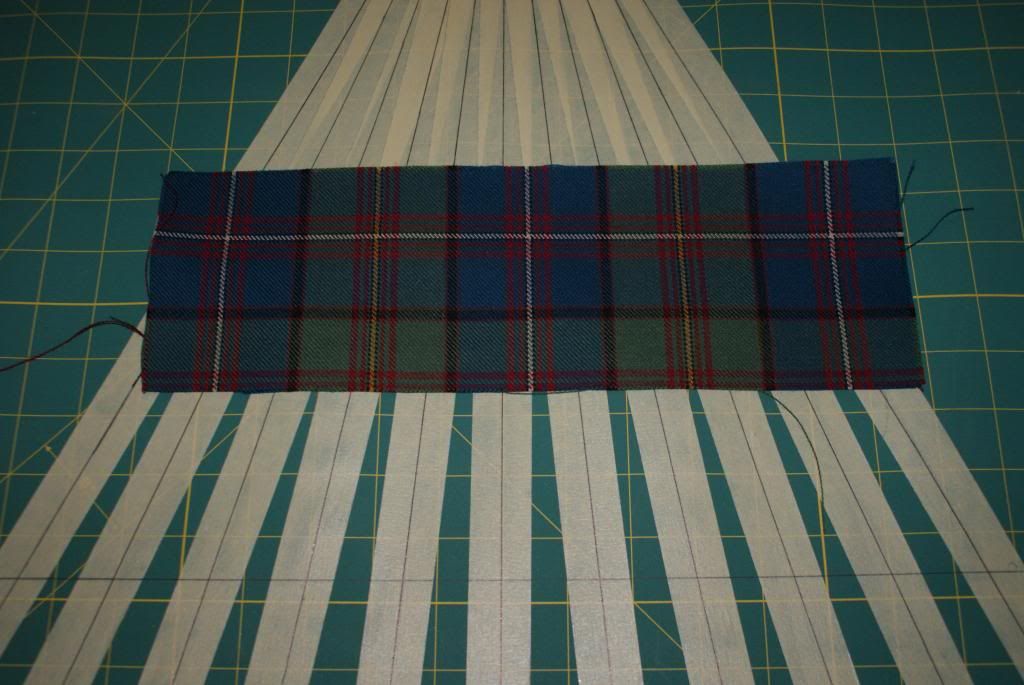
    All I have done is carefully moved the fabric strip up until it lines up with the Tartan pattern again but now there are more divisions for each Sett. The spacing of the pleats if marked her will be right about 7/8 inch. Just about perfect.

    The only difference is that in the first picture there will be 4 pleats to create one Sett and in the second picture it will be 6 pleats to create one Sett.

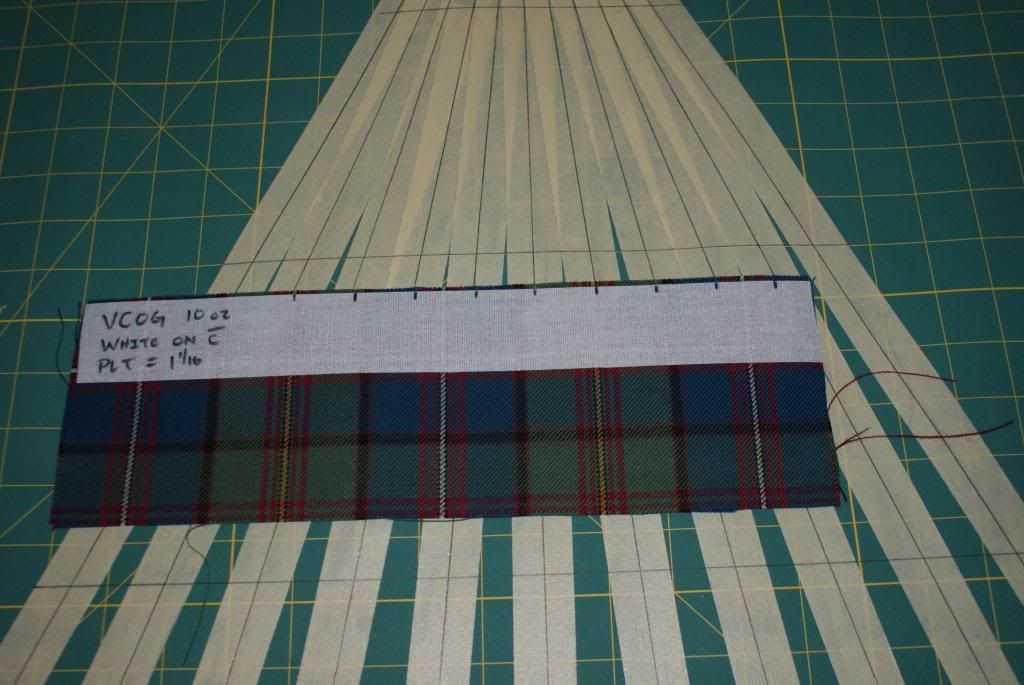
    See, no scratch pad with arithmetic all over it, no tape measures laying around, a no fractions or decimal conversions. Just move the fabric strip up and down till the tartan pattern aligns with the lines on the table.

    Now, here is the pop quiz!
    Steve Ashton
    www.freedomkilts.com
    Skype (webcam enabled) thewizardofbc
    I wear the kilt because:
    Swish + Swagger = Swoon.

  2. #2
    Join Date
    25th September 04
    Location
    Victoria, BC, Canada 1123.6536.5321
    Posts
    4,794
    Mentioned
    3 Post(s)
    Tagged
    0 Thread(s)
    The mid term pop quiz ---

    Look carefully at both of the layouts in the preceding post. The one with spacing of 1 1/2 inch and the one with the spacing of 7/8 inch. Can you see why you would not want to use either of these spacings to set the width of you pleats?

    Well in the spacing that is 1 1/2 inch the spacing is simply too large to keep the look of a traditional kilt. Pleats spaced this far apart look too rugged.

    And the spacing that is 7/8 inch has a problem too. Look closely where the lines of the grid cross the Tartan pattern along to top of the fabric strip. See how the lines are right at the edge of the small red lines? If I were to fold my pleats with these red lines right along the edge of the pleat they would disappear as I taper the pleat in the Fell area.

    A general rule is that you do not want an element of the Tartan pattern right on the edge of a pleat. As soon as you narrow to pleat to create the taper you will lose that element and the overall effect of the Tartan will be destroyed.

    So OK, let's go back to moving the fabric piece and see if we can find a place that will work better.

    Remember that there were already some lines marked on this Tartan fabric piece?

    Here is the same pic from two posts ago.


    I just sort of tossed the fabric strip on the table to take this photo but notice that it is almost lined up with the grid lines. But now count how many divisions there are in one Sett. Nope, not the six from before and not the four from before. Now there are five divisions in each Sett. The spacing is now just less than 1 1/8 inch. A little wide but not too much.

    But no element of the Tartan is aligned with the edge of a pleat. I will not lose an element when I taper the pleat.
    This is the spacing I will use for this kilt.

    OK, I've determined the correct spacing and width of the pleats. Now I just have to mark my fabric strip.

    I'm going to do this as accurately as I can.


    Please notice that I am using the upper edge of the Tartan strip. I am then using a ruler to draw a line straight down from where the grid line crosses the Tartan pattern.

    And here is the finished pleat lay-out pattern.


    Pretty slick huh? Everything looks good. The Sett of the Tartan is evenly divided into equal spaces. No element of the Tartan will be lost in the tapering. And here is the cool part.

    When you have done this just once, you can do almost any Tartan in less then three or four minutes.

    I'm going to take a break for tonight. I'll take the pics for the next part of this tutorial at the shop in the morning.
    The next steps are how you use the fabric strip to mark your fabric in preparation for sewing.


    Oh, remember that I said that we have been using the method at Freedom Kilts for a while now. And remember that I said we save the fabric strips for the next kilt.

    Here are just a few of the strips we have on file. Note how many different Tartans. This is sort of proof that this really does work.


    OK, until tomorrow.
    Steve Ashton
    www.freedomkilts.com
    Skype (webcam enabled) thewizardofbc
    I wear the kilt because:
    Swish + Swagger = Swoon.

  3. #3
    Stephan is offline Oops, it seems this member needs to update their email address
    Join Date
    12th July 12
    Location
    Ottawa, ON, Canada
    Posts
    66
    Mentioned
    0 Post(s)
    Tagged
    0 Thread(s)
    Well!!

    There must be a little engineer in my blood because this all kinda makes sense!! If everything pans out and I manage to attend Kilt Kamp 2014, I will make sure I am in attendance for this part of your lecture although I'd be in the traditional kilt making camp. I'm looking forward to your next installment!!

    Stephane

  4. #4
    Join Date
    6th December 13
    Location
    Coventry UK
    Posts
    197
    Mentioned
    0 Post(s)
    Tagged
    0 Thread(s)
    Really impressive Steve, does it work for assymetric as well.

    I have never made a kilt, but its quite a good way to spacing out the pleats, thank you for sharing your hints and tips.

    What about where the kilt gets tighter at the buckles and flares out at the rise, is the size of the rise equal to the fell (seat) or not.
    You have two bits of fused material on the kilt is from the fell down or fell to the waist.

Bookmarks

Posting Permissions

  • You may not post new threads
  • You may not post replies
  • You may not post attachments
  • You may not edit your posts
  •  

» Log in

User Name:

Password:

Not a member yet?
Register Now!
Powered by vBadvanced CMPS v4.2.0