The illustration in Barb's book is on page 76. The felling stitch is basically an overhand, rollling, or pinch stitch. (depends on what it's used for, but exactally the same thing) Disregard the little dotted line shown in the drawings, those are the basting stitches.
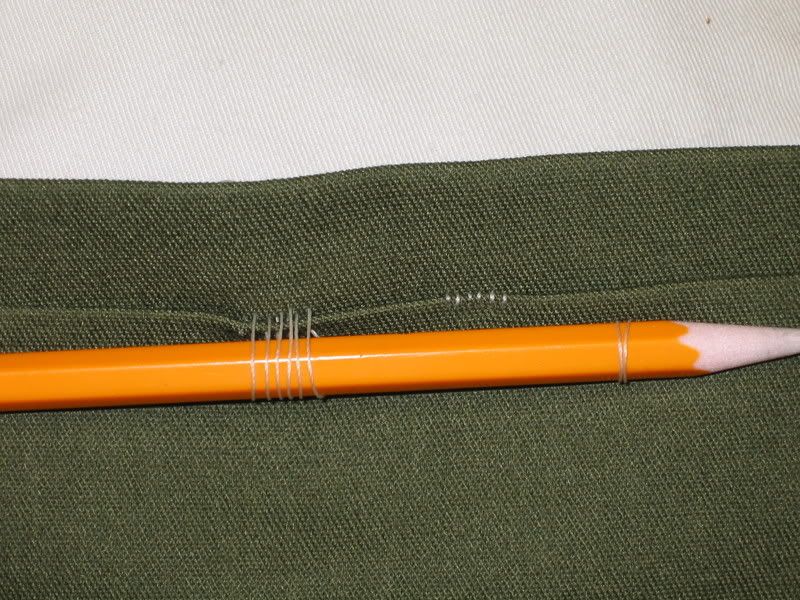
Imagine using a needle to wrap the thread around a pencil. Hold the pencil in your left hand with the eraser tucked in the crook of your little finger The shank of the pencil rests in the palm of your hand and the point comes out between your first finger and your thumb. With the needle in your right hand, bring it up from under the pencil on the side closest to your body. Now bring the needle over the top of the pencil and down the side away from you back to the bottom.
One stitch complete. Wrap 'round and 'round working towards your left hand.
Now imagine fabric in place of the pencil. Your needle will catch the fabric each time you bring the needle upwards and then downwards again.
The needle is brought up from behind through four layers of fabric. Catch only the very edge of the top two layers. then reinsert the needle back down through the bottom two layers only. Then move left slightly and start another stitch.
The thread of the stitch coming up is straight and underneath is slightly angled.
This angle underneath is what will cause the pleat alignment to be off slightly needing you to offset the alignment with your fingers holding the pleats as you stitch. How much of an angle is a matter of practice. Within ten or so stitches you should be able to tell how it looks and rip out if necessary.
The length of these stitches should be 1/16th to 1/8th of an inch. The width should be almost nothing. When you pull the stitch tight it should completly disappear. The total number of fabric yarns caught in each stitch should be only two or three yarns of each layer.
Here is a pic of some sample stitches. I did them on solid colored fabric with thick white thread only for demo purposes.
On the right are six finished stitches.
On the left you will see six more stitches done loose and wrapped around the pencil.
I wasn't trying to get these stitches perfect so they aren't. For demonstration only.
I hope this answers your question.
Steve Ashton
www.freedomkilts.com
Skype (webcam enabled) thewizardofbc
I wear the kilt because: Swish + Swagger = Swoon.


Bookmarks