|
-
3rd February 06, 01:24 PM
#21
I love that you are making one, not just for yourself Tartan Hiker but also for your two sons. I would love to give my son something truly special like this. He's a little young for it still (only six), but as I said before I won't get to a project like this probably for quite some time.
-
-
3rd February 06, 03:47 PM
#22

This is an excellant post. I'll definetly be making one of my own. I agree,this would be a good addition to the articles.
-
-
3rd February 06, 04:16 PM
#23
 Originally Posted by pdcorlis
It would be great to edit these instructions together it into an article for the archives when you get done with the project. Is that possible?
My immediate thought was that this needs to be on a web page of its own. Do you have hosting of your own, or a volunteer?
-
-
3rd February 06, 04:18 PM
#24
Originally Posted by auld argonian
..., wives have a tendency to roll their eyes and give you the cold shoulder when they see that happening.
"You're making knives now? What happened to fly-tying, wood working, oil painting, photography and kilt making?"
"Silence, woman! Be grateful that you're married to a contemporary renaissance man!"
So I'm following this with interest and looking at ordering a couple of blade blanks. Incidentally, is that 4140 steel considered carbon steel?
Best
AA
 Still chuckling... Still chuckling...
-
-
3rd February 06, 06:54 PM
#25
Originally Posted by Sherry
Still chuckling...
Tracy doesn't chuckle until she's checked to make sure there hasn't been a sudden loss of turgor pressure in our already emaciated checking account: then she ruffles what is left of the hair on top of my head and calls me her little "kook'.
Bryan...that's a good thing, as far as I'm concerned... 
-
-
4th February 06, 02:18 AM
#26
Originally Posted by Tartan Hiker
If you find that you have gone too far and gotten a sharp edge, flatten it carefully with the file so you don't cut yourself!
VERY IMPORTANT!!
I massacred my right hand in November when fixing the blade in the handle - stooooooopid!
I couldn´t work all december and had to spend christmas at home with my family.
But my son will get a knife "baptised" in his dad´s own blood, I hope he will treat it with the respect it deserves!
-
-
4th February 06, 10:57 AM
#27
Adding the bolster
Well, it's raining, snowing, and blowing outside so what better time for the second installment of the build-along! I'll have to cut this post into two to get the photos to load.
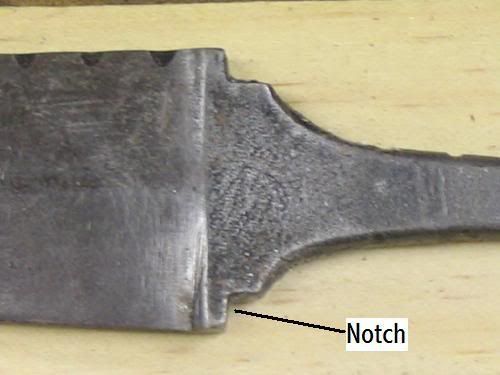
Next we must add a bolster. Some blades come with a round tang and no flare at the butt of the blade, so this step is not necessary. The blades I'm using have bolster notches, so we'll add a metal bolster.
Custom knifemakers will use brass, bronze, silver, stainless steel, etc. for the bolster. Remember that we're making a "common man's" sgian, so I'm using aluminum. It works easily with files and paper, is cheap, and has that satin silver look to go with my blades. I picked up a 3' piece of 2" x 1/8" flat aluminum at the home store for $4. What doesn't get used for this project will make a dandy straight edge.
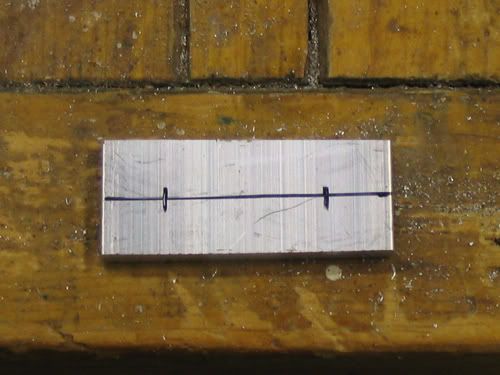
Cut a piece of material that is wider than you need in each dimension. My piece turned out to be 1.5" x 5/8 ". Mark the center line, then mark where the shoulders of the notches fall.
-
-
4th February 06, 10:58 AM
#28
Adding the bolster, part 2
Determine the thickness of the tang. Mine is 3/16". Select a drill bit slightly smaller than that size (in my case, 11/64"). Mark the line using the drill bit as a guide...you're marking where the drill holes will fall. Dimple the centers of these marks with a punch or a nail, then drill pilot holes with a tiny bit.
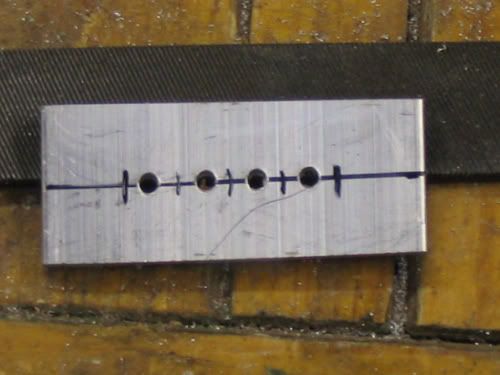
Now use the larger bit.
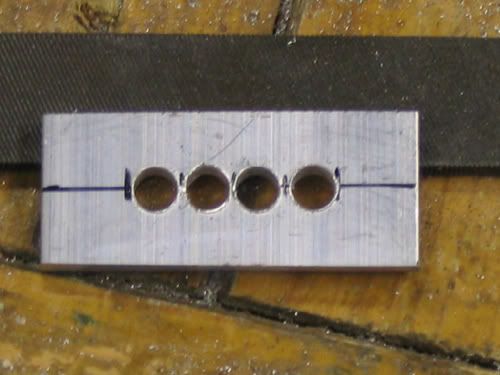
Start with a small round file to establish a rectangular slot, then finish with a small flat bastard file. Take it very slow and try-fit often or you'l remove too much stock. Ideally the bolster should fit tightly enough to require careful tapping to seat it. Here's what it looks like when done.
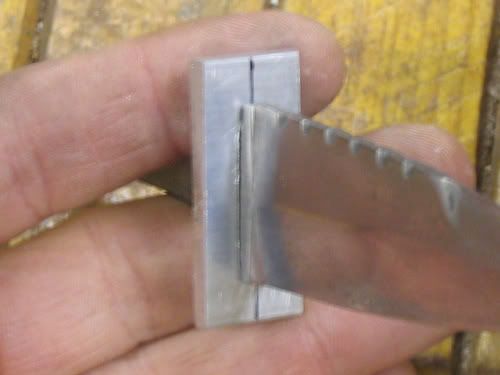
Next...the woodwork.
Last edited by Tartan Hiker; 5th February 06 at 06:21 AM.
-
-
4th February 06, 09:15 PM
#29
I can't believe the details in this thread! I don't think I will ever have the time to make my own sghian dubh, but I love seeing the details.
The kilt concealed a blaster strapped to his thigh. Lazarus Long
-
-
4th February 06, 10:21 PM
#30
Rab Gordon's post got me to thinking about the lack of tempering in the project blades. After cruising the web for a few minutes I discovered that adequate tempering can be accomplished right in my own kitchen. Any oven that reaches 450 degrees or so can be used, toaster ovens use less electricity but probably need an oven thermometer to accurately determine the temperature. I dont have a wee oven, so the main kitchen oven was pressed into service. Caution...be sure all the oil is off the blades before proceeding! (I bet you can guess why!)
Here's a pretty good example of the directions I found:
"I set the oven on my wife's kitchen stove to 325 degrees, then wait 20 minutes for it to come to a stable temperature. I put the blade on an aluminum pie pan, or a piece of aluminum foil, and put it in the oven. Why the pan or foil? So that the steel doesn't get any direct radiant heating if the oven comes on again. Leave the blade alone for about 15 minutes.
After 15 minutes, lift it out with tongs and look at it. It should be a light straw color. If it is a deep straw or blue, your oven was too hot, so take it back to the forge (or torch) and harden it again. If it is not yet a light straw color, leave it out of the oven, turn the oven up another 25 degrees, wait 20 minutes, put the blade in for 15 minutes, etc. When you finally find the temperature that produces the straw color, note it down for future use. Put the blade back in the oven at that temperature, leave it another 15 minutes. Then turn off the oven. Leave the blade in the oven until the oven is cold".
Other sites gave similar directions, but the times in the oven ranged from 15 minutes to two hours. Several sites suggested that after the blade reaches room temperature it should be placed in the freezer overnight.
I followed the directions above and discovered that the straw color appeared at 395 degrees F. I left the blades in the oven for one hour at that temperature, allowed them to cool to room temp, then placed them in the freezer.
Without going into the fine details, heat treating and then tempering reorganizes the arrangements of the molecules in the blade, resulting in a crystalline pattern that is both hard and somewhat flexible...enabling the blade to hold an edge but reducing the risk of shattering or chipping.
Here's a photo of the tempered blade. (not pretty, and smelling vaguely of pizza)

The color is due to oxidation on the surface and will come right off with sandpaper.
Now we're ready to add a handle!  Thanks Rab! Thanks Rab!
Last edited by Tartan Hiker; 5th February 06 at 06:19 AM.
-
 Posting Permissions
- You may not post new threads
- You may not post replies
- You may not post attachments
- You may not edit your posts
-
Forum Rules
|
|


Bookmarks