|
-
2nd February 06, 09:59 PM
#1
Sgian dubh Build-along
I'm a do-it-myself kind of guy, and I bet lots of you are as well. In real life I'm a biology teacher, but in my down time I build arrows, strings, and leather accessories for traditional archers (those who shoot longbows and recurves, not those mechanical arrow-flinging devices so popuar today). I have always wanted to build my own knife, and never had any truly compelling reason...until now. With the arrival of my new kilt I had to have the minimum accoutrements, which I decided must be a belt, sporran, and (of course) a sgian dubh. I committed to making all these myself. The belt and sporran are done, but I'm still working on the knife.
Anyway, I thought that there might be others that would like to give this knifebuilding thing a try but who were afraid that it would require too many exotic tools and techniques. Well, it really doesn't! My shop is fairly well equipped, but I could easily see this project successfully completed by someone with less equipment. I'm very new to this list, so if this isn't an appropriate thread please tell me!
So here is the first installment, where I prepare the blades. Now if you are the type who would n'er carry a sgian dubh that was not crafted of Scottish steel with a bog-oak handle and silver hardware, then scroll down nae further!
This one will have a good 'ol Black Walnut handle, because I really like walnut and I happened to have a chunk sitting around looking for a knife to wrap around!
First of all I had to find blade blanks. I found just what I was looking for at Track of the Wolf in Elk River, Minnesota. (Item # Blade-7, 7" dirk) The blades are cast from 4140 steel and have not been finished in any way. $11.95 each. A quick phone call and three were on their way (one for myself and one each for the sons!)
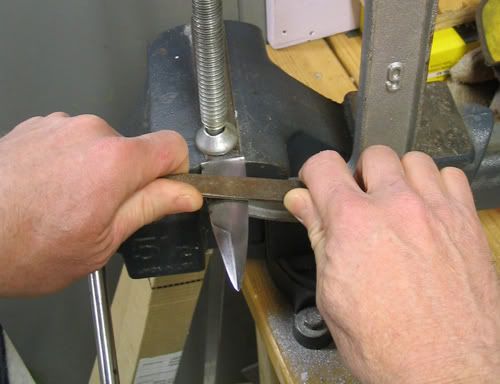
These blades are not finished at all (no polishing or heat treating) so there is a lot of hand work in getting them ready to haft. First they must be smoothed to remove the rough surface caused by the casting process. Clamp the blade to a solid surface and use a small mill bastard file, pulling the file from butt to tip. Pulling the file this way helps maintain the flat surfaces of the blade. You need to remove a good bit of metal to get down to a nice smooth finish. Don't bevel the edges yet, but get then down to approximately 0.5 mm. If you find that you have gone too far and gotten a sharp edge, flatten it carefully with the file so you don't cut yourself!
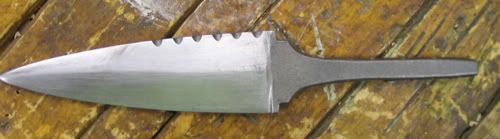
Here's a blade after the initial filing. I don't have a photo of the blade before filing, but if you look at the tang you'll get an idea of how rough the finish was. It took about two hours to get the blade to this stage; 90 minutes with the file and another 30 minutes with 220 grit silicon carbide paper to remove the file marks. Wrapping the paper around a small block of wood helped maintain the flat surfaces of the blade. Use a power sander only if you really know what you're doing and you have a respirator.
After getting the blades smoothed it is time to harden them. If you don't intend to actually use the blade for anything more than slicing the occasional apple this step may not be necessary, but an unhardened blade will not hold an edge and the tip is prone to snap off.
There are many ways to harden the blade. The easiest is to heat it with a torch and quench it in oil. I took mine to the local community college and the metals instructor helped me with this chore. Fire up an acetylene torch, heat the blade evenly to cherry red, rapidly quench it in oil, and you're done. Any shop that works with metals should be able to do this job for you. It took us 15 minutes to do three blades.
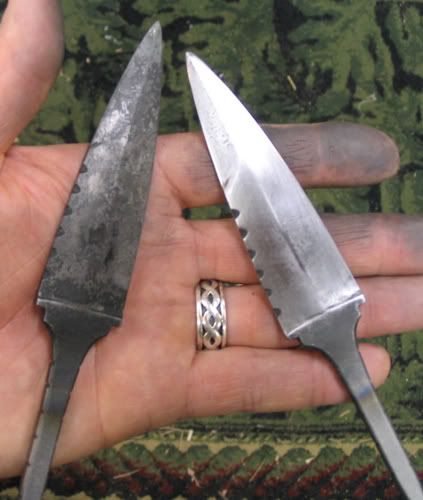
After heat treating the blade is too hard for the file to cut, so all work must now be done with the silicon carbide paper. In this photo the blade on the left is as it appeared after hardening. The one on the right has been polished with paper. Start with 220 grit, then work up through 320, 400, and 600 grit for a mirror finish. I chose to leave my blades a bit underpolished as this gives them an "antiqued" look.
That's all for now. I'll be back again to show you how to attach the handle.
-
 Posting Permissions
- You may not post new threads
- You may not post replies
- You may not post attachments
- You may not edit your posts
-
Forum Rules
|
|


Bookmarks