|
-
2nd January 22, 11:06 AM
#1
Preparing to make my first kilt.
Happy New Year Xmarkers!
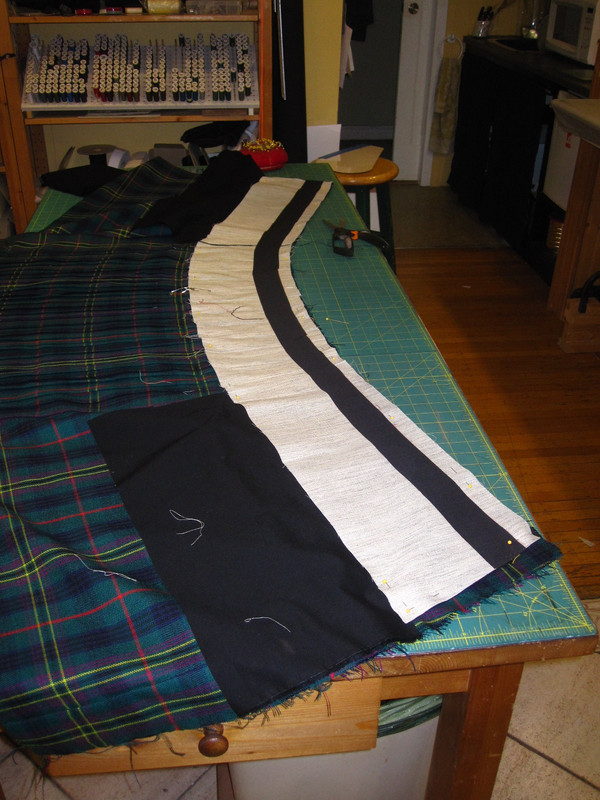
I'm preparing to make my first kilt and would like to have a few sets of eyes go over my numbers with me to ensure I'm on the right track. I had my wife, who is sewing challenged, help take my measurements accordsing to the method in TAoK. My waist measered 36", hips at 41", length 23", and the fell at 7.5". I took these measurements again with my oldewst daaghter who is learning to sew and came up with the same numbers except the length, which was 24". I've been taught to measure twice, cut once. In this case I'll likely measdure a couple more times before reducing my tartan to length. I have ordered and received my desired tartan which is in my profile picture. The mill says the set is approximately 20.3 cm, which converts to just under 8". I measured the set on the fabric received, from prominent red stripe to prominent red stripe, and it is 7 to 7.5" depending on where I measure the set at along the length of fabric. OK, now with all that out of the way... on to layout.
Following the guidance in TAoK I worked out the following splits: waist 19/17, hip 20/21. I started with an even split and worked up in the apron in .5" increments, while reducing the pleats the same amount. This one-inch difference in the apron doesn't allow for much shaping between the hip and waist. Then I read Barbara's tips and tricks and added .5" to the hip measurement which I then worked the split to 20.25/21.25. On to estimating pleat size.
With the set repeat from the mill and my own measurements I chose to use 7.5" for the repeat size. First, I estimated the number of pleats at either 29 or 27 pleats. 29 if I used my 7.5" set measurement and 27 pleats if I used the mills 8" measurement. This number of pleats is based on 6 yards of cloth available for pleating out of an 8-yard length of cloth. Regardless of which hip split I use my hip pleats will be close to .75" and my waist pleats at just over .5" using my 7.5" set repeat measurement.
Please look over my numbers and let me know if I'm on the right track. If I am, then I'll take the measurements again and start marking everything out on the tartan to verify the numbers.
measurements Waist Hip
Apron 19" 20"
Pleats 17" 21" or 21.25"
Pleat width .5"+ .75"-
29 pleats, "+" slightly more than, "-" slightly less than.
Thank you all
-
-
2nd January 22, 12:57 PM
#2
If your waist circumference is 36" - then 36/2=18 - slightly more than half could be 19 front, 17 rear. Or 20 front, 16 rear.
If your hip circumference is 41" - then 41/2= 20.2 - Slightly more than half could be 20 front, 21 rear. Or 19 front, 22 rear.
(Please see page 50 of TAoK)
I would ask how you took the hip circumference measurement? 41" seems a bit small and one place you do not want the kilt to be tight is at the hip line. If you were to err it would be best to err large instead of small.
So, when you take a hip measurement please make sure you pull the tap measure out in front to simulate he aprons falling straight down from your belly.
A Fell Length of 7.5 Seems just a bit short. "By the book" - Fell Length is 1/3 of the Drop (without Rise) So a kilt with a Drop of 23 would have a total length of 25 and a Fell Length of 7.66.
A kilt with a Drop of 24" would have a total length of 25" and a Fell Length of 8".
If you are making a kilt In Accordance With (IAK) "The Art of Kiltmaking" please remember that the book is instructions for a Traditional Style kilt with a Full Waist Height. Or the top strap right up under the ribs at the side. The instructions do not work as well for a kilt with a waist height lower than Full Waist Height.
For example - I am exactly feet tall and my Tewksbury kilt had a Drop of 23" and a total length of 25". (Please see page 46 of TAok)
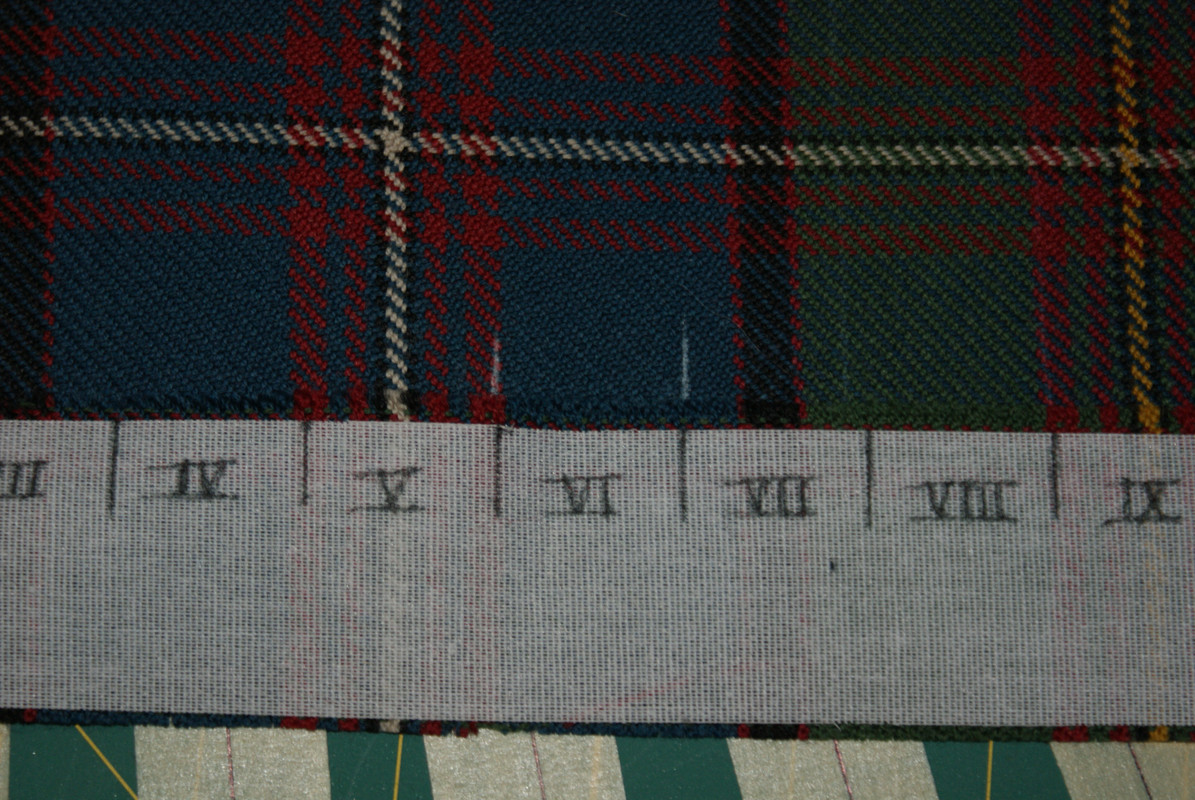
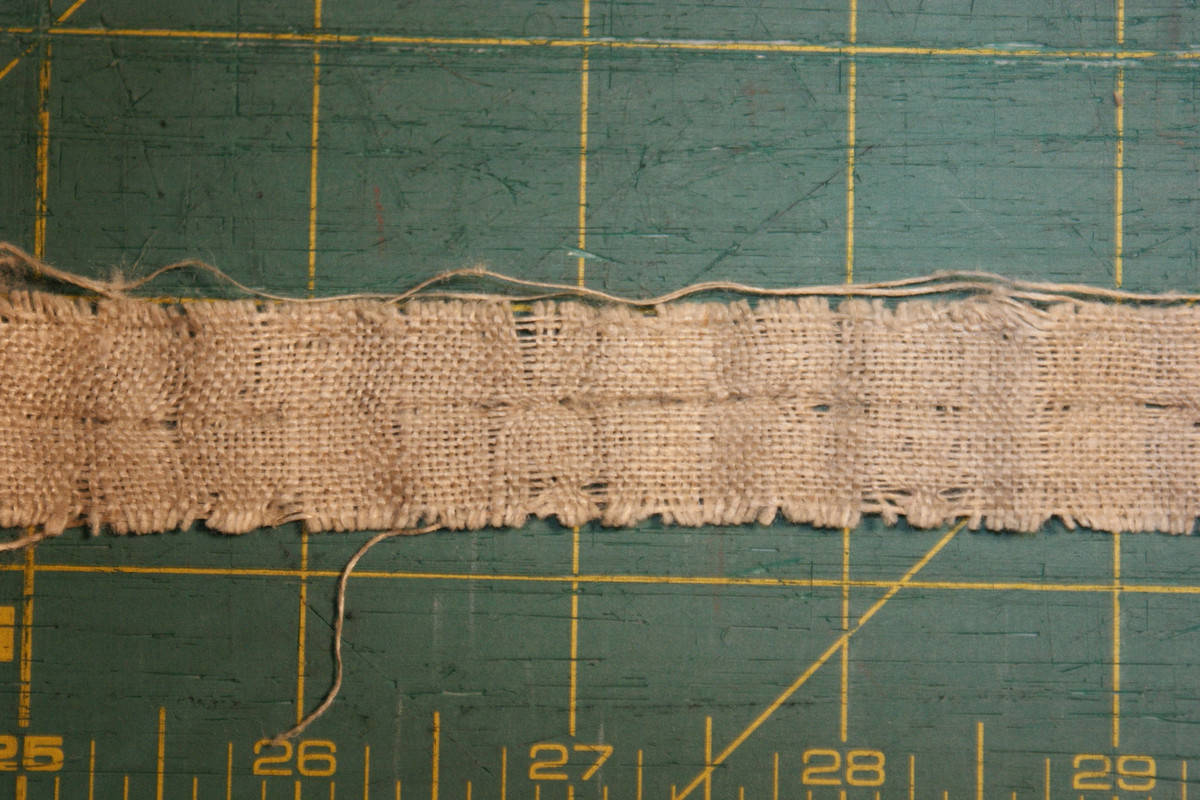
And when measuring the Sett of a Tartan you measure from the pivot points. So find the pivot points and measure from the left side of a line to the left side of the same line in the next full repeat of the pattern.
I can't see what Tartan is in your Avatar very well. Can you give us the name, weaving mill, and the weight of the fabric?
How many pleats your kilt will have depends on a lot of different factors such as the Sett size, the type of pleat, if folding to reveal to the Sett or to the stripe and how many full repeats of the Tartan pattern you have left over after laying out the aprons. (Remember to account for the apron edge hems, fringe, taper, deep and reverse pleats.)
Last edited by Steve Ashton; 2nd January 22 at 01:06 PM.
-
-
2nd January 22, 01:59 PM
#3
 Originally Posted by Steve Ashton

If your waist circumference is 36" - then 36/2=18 - slightly more than half could be 19 front, 17 rear. Or 20 front, 16 rear.
If your hip circumference is 41" - then 41/2= 20.2 - Slightly more than half could be 20 front, 21 rear. Or 19 front, 22 rear.
(Please see page 50 of TAoK)
I would ask how you took the hip circumference measurement? 41" seems a bit small and one place you do not want the kilt to be tight is at the hip line. If you were to err it would be best to err large instead of small.
So, when you take a hip measurement please make sure you pull the tap measure out in front to simulate he aprons falling straight down from your belly.
A Fell Length of 7.5 Seems just a bit short. "By the book" - Fell Length is 1/3 of the Drop (without Rise) So a kilt with a Drop of 23 would have a total length of 25 and a Fell Length of 7.66.
A kilt with a Drop of 24" would have a total length of 25" and a Fell Length of 8".
If you are making a kilt In Accordance With (IAK) "The Art of Kiltmaking" please remember that the book is instructions for a Traditional Style kilt with a Full Waist Height. Or the top strap right up under the ribs at the side. The instructions do not work as well for a kilt with a waist height lower than Full Waist Height.
For example - I am exactly feet tall and my Tewksbury kilt had a Drop of 23" and a total length of 25". (Please see page 46 of TAok)
And when measuring the Sett of a Tartan you measure from the pivot points. So find the pivot points and measure from the left side of a line to the left side of the same line in the next full repeat of the pattern.
I can't see what Tartan is in your Avatar very well. Can you give us the name, weaving mill, and the weight of the fabric?
How many pleats your kilt will have depends on a lot of different factors such as the Sett size, the type of pleat, if folding to reveal to the Sett or to the stripe and how many full repeats of the Tartan pattern you have left over after laying out the aprons. (Remember to account for the apron edge hems, fringe, taper, deep and reverse pleats.)
Thank you for the reply Steve,
I had my wife take my hip measurement around the widest part of my hips with the tape just tight enough that it wouldn't fall with two of her fingers under the tape. With that we measured 41". Again, I had my daughter take that measurement and she came up with the same number. There is a comment on page 52 that says to select a hip split of not more than one inch more in the pleats than the apron unless the person has prominent buttocks, which I do not. And while I do have a bit of a stomach, I can still see my belt buckle with my shirt tucked in. Which is why I was considering that half inch Barbara mentioned in her tips and tricks thread.
I arrived at the fell measurement by measuring from my waist to my hip, which I now realize is not the way the book says to do it. That method must have stuck in my head from Robert MacDonald of West Coast Kilts. I have been following his YouTube channel for some time. So to that end, using a calculator instead of the tape I came up with the same numbers as you mentioned.
As for measuring the set, I was measuring the pivots and I chose several to measure that all verified my numbers. Here is a link to the fabric specifications; https://dcdalgliesh.co.uk/fabric/482313
Thank you again.
-
-
2nd January 22, 03:19 PM
#4
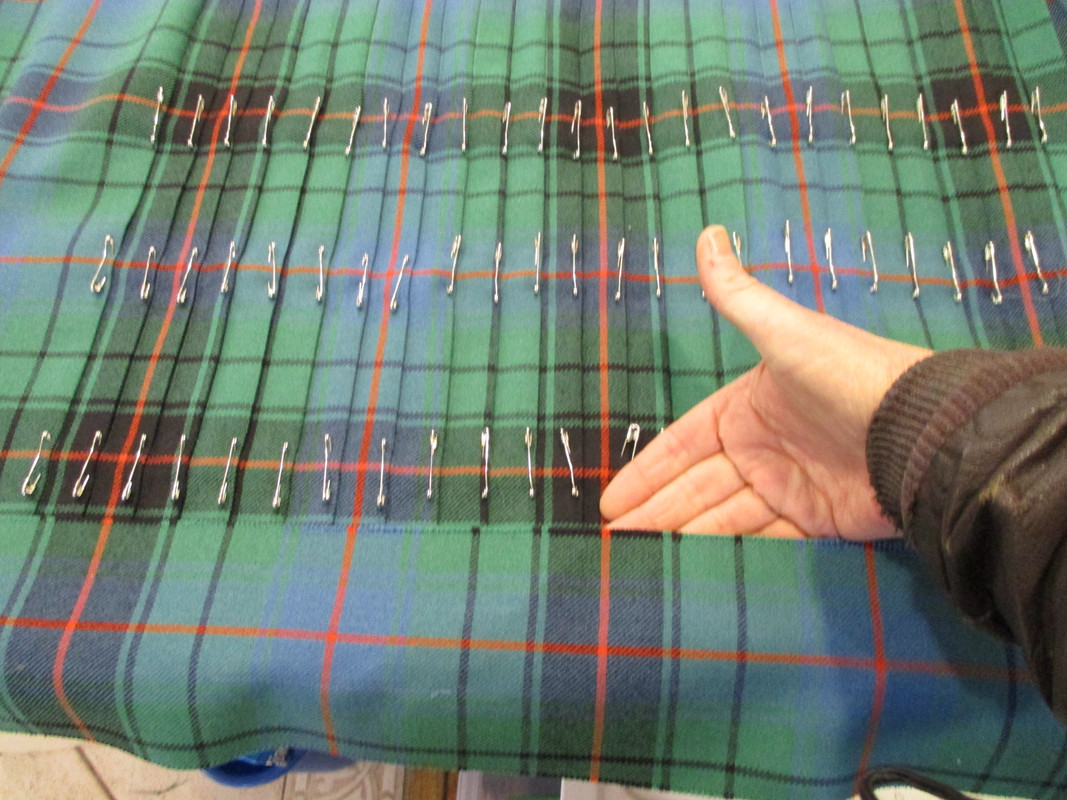
I realized I failed to mention that my plan is to pleat to the set. So out of 8 yards of fabric, allowing one yard for each apron and other considerations that leaves me 6 yards for the pleats. Pleating to a 7.5" set should allow for 29 pleats at just under .75" per pleat at the hip. I'm going through the math for the pleats so I know what to expect when I start laying out and marking the fabric. Hopefully once I layout the fabric and find the rear center stripe everything will line up.
-
-
2nd January 22, 04:18 PM
#5
Pleating to Sett is a bit different than pleating to Stripe.
You will need to plan to allow one full Sett - plus - the width of a pleat for each pleat.
So if your pleats have a .75 inch reveal, and your Sett is 7.5 inches, each pleat to Sett will require 8.25 inches of fabric.
-
-
2nd January 22, 06:20 PM
#6
Not everyone grasps the concept of how to lay out pleats for display to Sett from the first reading of TAoK. It can be so confusing that when Barb teaches kiltmaking she needs at least one full day just to explain it. And then the next full day answering questions about it to each person individually.
May I offer an alternative method.
You begin by using a method from High School Geometry class that allows you to divide any line into (a close approximation) of any number of equal spaces.
This is called A Magic Starburst. A set of lines that start at the top, at a single point and radiate out to any number of equally spaced divisions at the bottom.
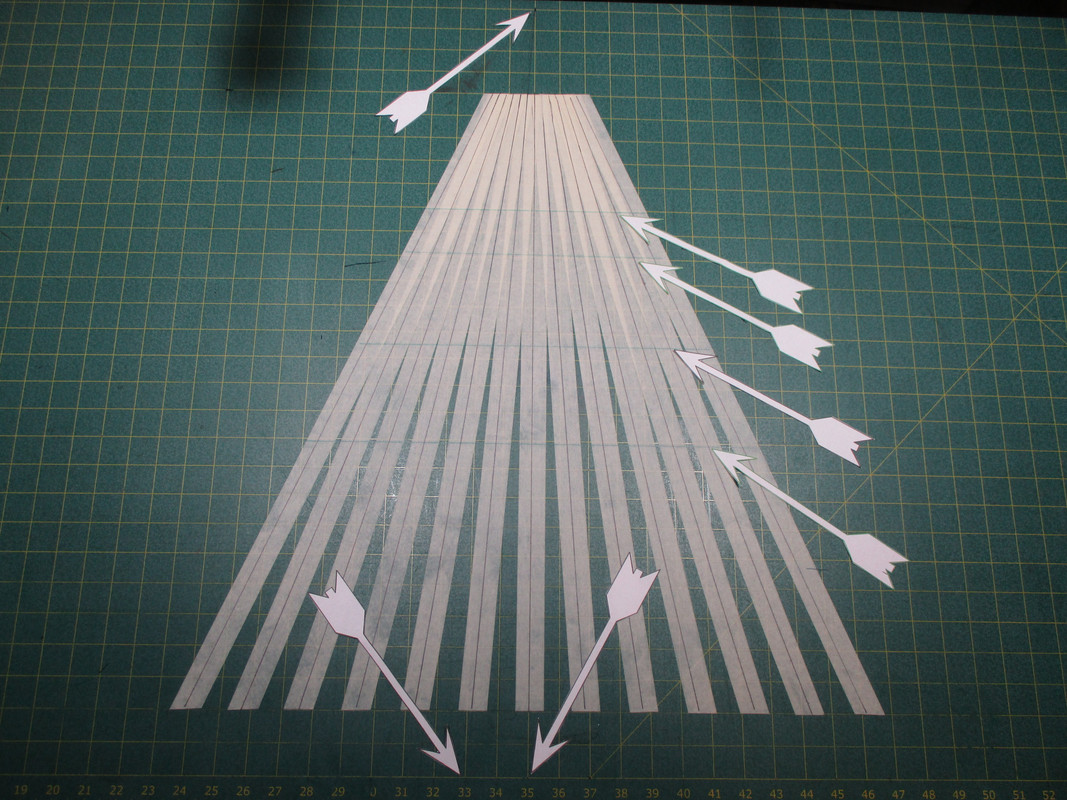
Notice please, the arrows in the center. The bottom arrow points to where the spacing equals 1.25" The next higher arrow is at spacing of 1". Then .525". The top arrow is the width of the pleats at the waist just for visual reference to check the Tartan at the top of the taper.
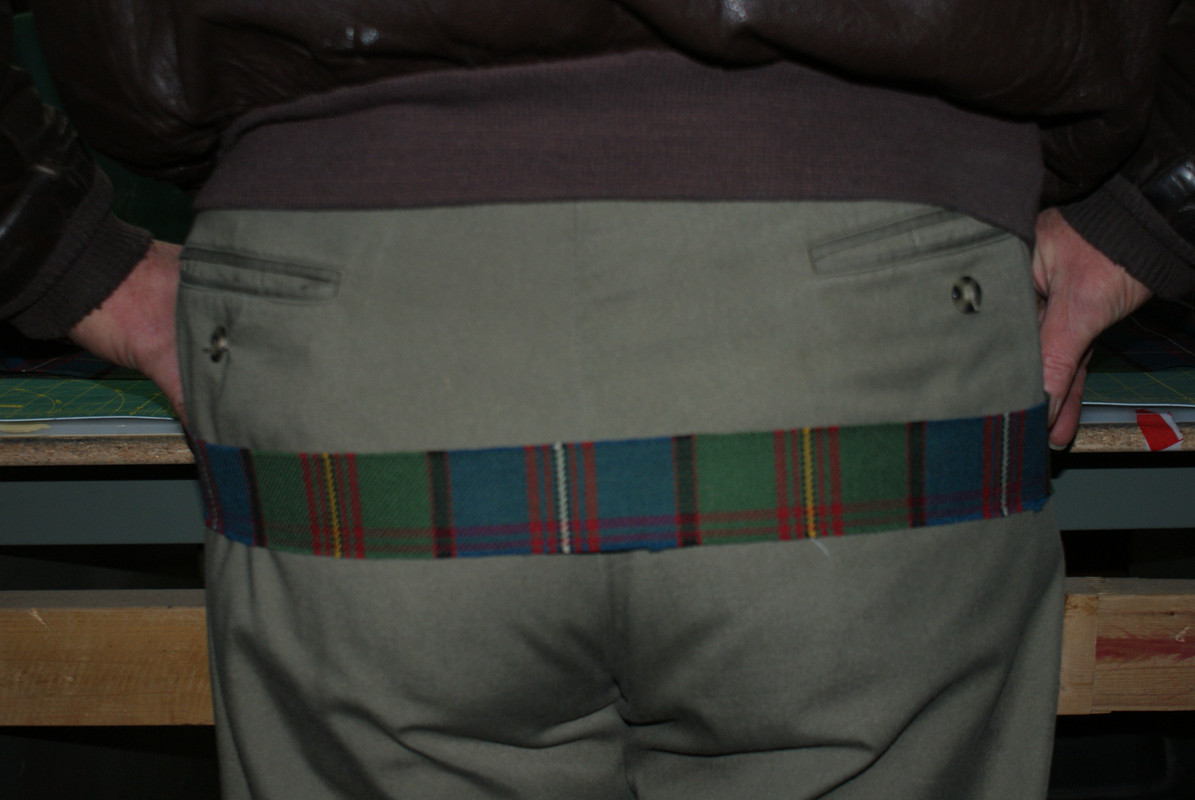
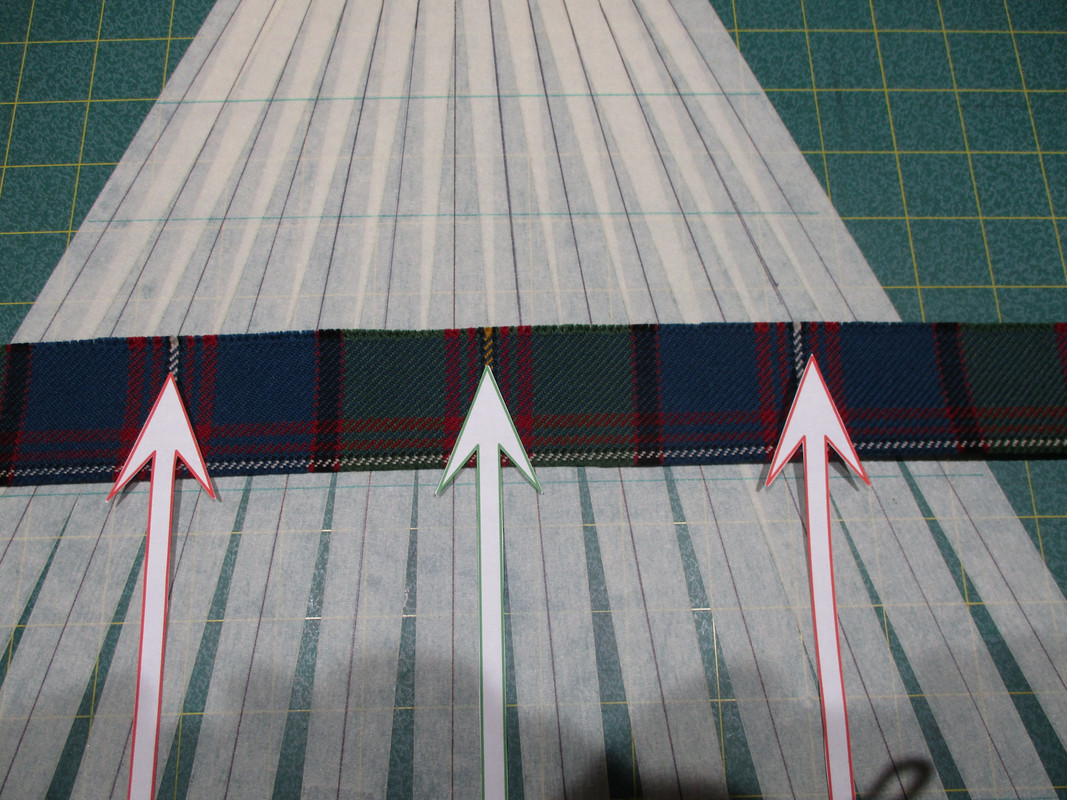
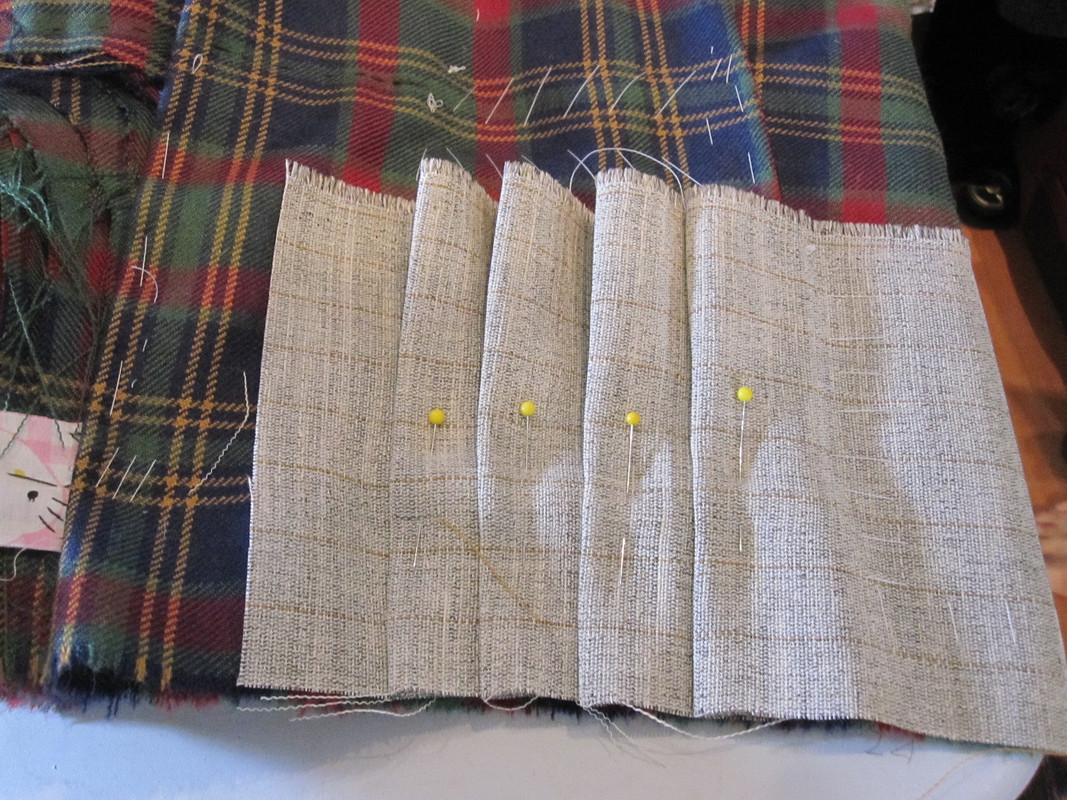
You then cut a small section of the center of your Tartan from the top band. This should be long enough to reach around your hips in the back with your chosen center stripe in the middle.
Iron on a piece of non roll waistband interfacing to keep the strip stable.
You can then lay the fabric strip directly onto the magic starburst. Move the strip side to side until one pivot point is on one line and the next pivot point on any other line. You have just divided your Tartan Sett into an equal number of divisions.
But these divisions may not be ideal in the tapered section of the Fell. The idea is that you retain the look of the full Tartan. No element should be cut off when the pleats taper smaller.
You do this by moving the fabric strip side to side until it looks good.
You should be able to see that in this example the red lines may be cut off when tapered.
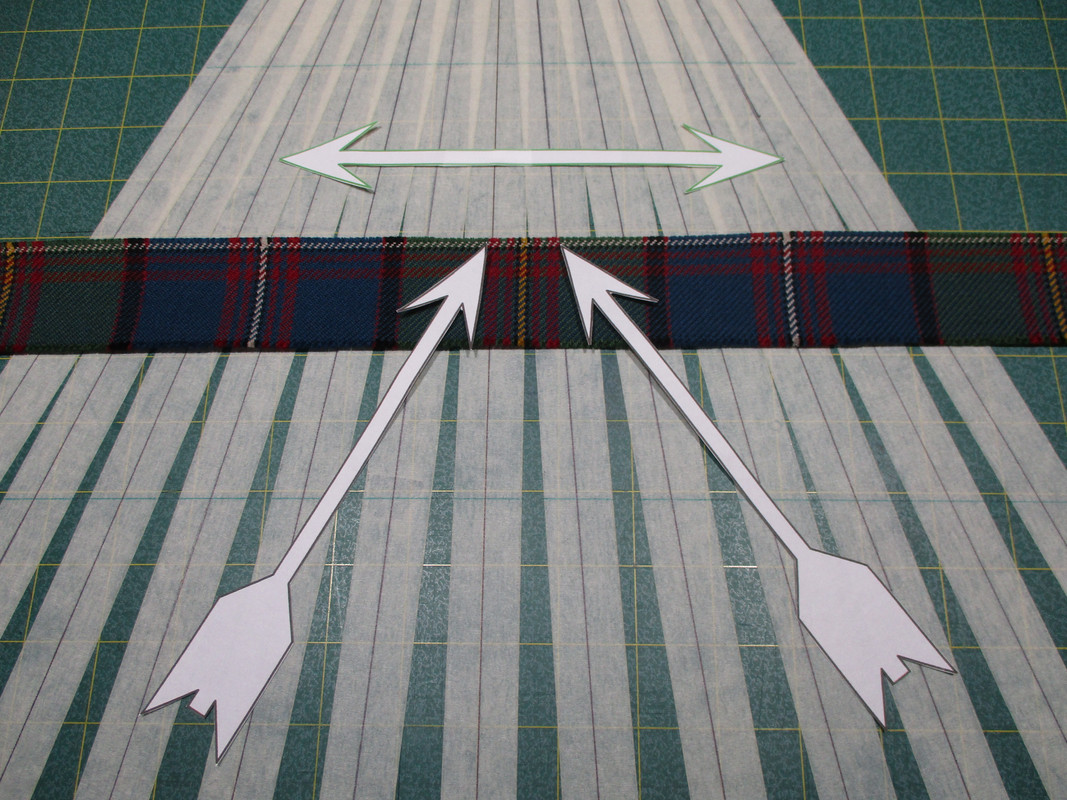
If you do not find a suitable set of division lines you repeat this process with more or fewer divisions per Sett. Move the fabric up and down to align pivot points and then side to side to compare the Tartan pattern to the tapered width.
The width of each individual pleat should be no wider at the hip line than about 1.25 inches and no narrower than .625 inches. How much each pleat tapers depends on your shape.
At some place on the starburst you will find a set of divisions that meet the width you want and will pleat up and taper nicely.
All you need to do now is mark the interfacing so that your tartan strip is divided into a number of equally spaced division, Mark and count the number of pleats from end to end of the strip that is long enough to reach across the width of your butt.

You can now lay your tartan strip directly onto your kilt fabric and mark the pleats.
When you are all done and your kilt is sewn, you will be able to lay your fabric strip right onto the pleats of your kilt - and everything will line up perfectly.
Now, I will include a caution - Barb Tewksbury does not like my Magic Starburst method of laying out pleats.
I guess it is too mechanical, too much of the thinking of an engineer. I suspect that she prefers to keep the "art" in "The Art of Kiltmaking".
But I used this method in my kilt shop for almost 20 years. I also taught it to my students at my half of Kilt Kamps. In fact it is one of my students, who had taken Barb's course the previous year, who took my class the next and exclaimed, "That just makes too much sense. It's almost like magic. A Magic Starburst."
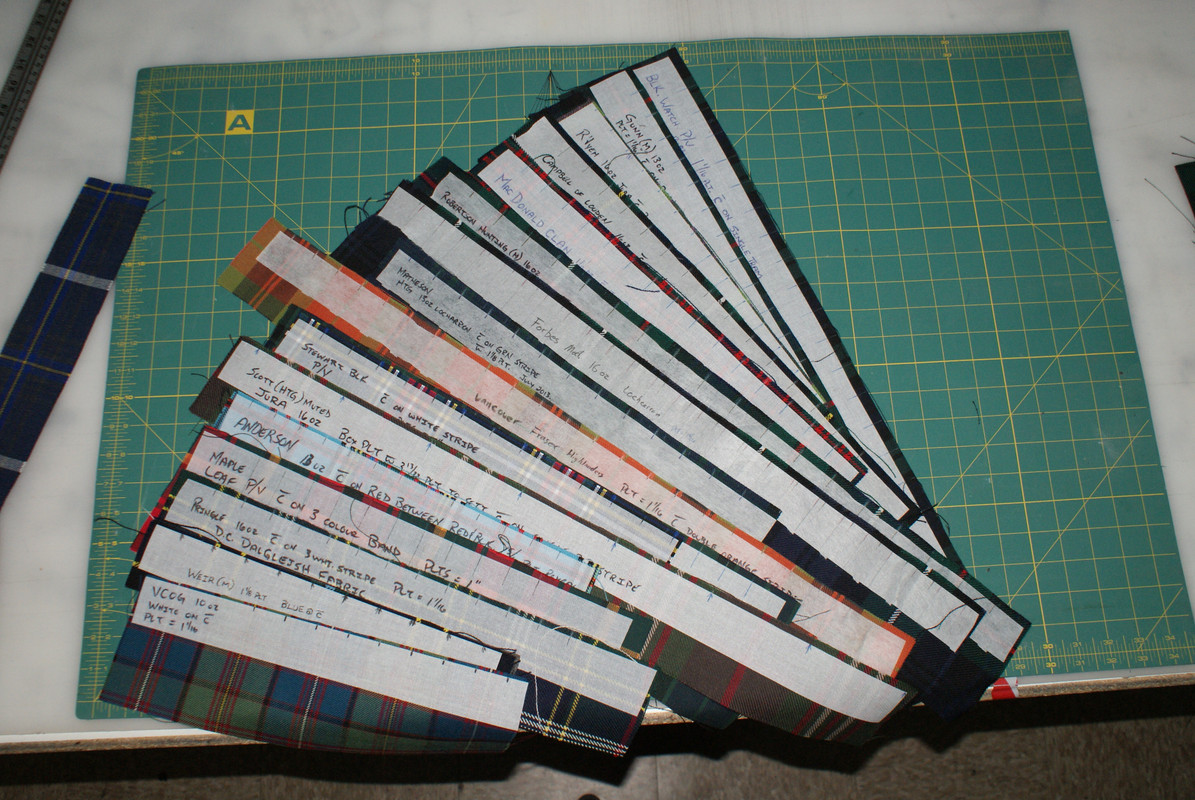
When I retired I found that I had a collection of over 450 Tartan strips all marked out to pleat to Sett. (this is just a very small sample) I never found a single Tartan that this method did not work with.
a starburst permanently on my layout table I could lay out and mark an entire kilt in about 2-3 hours.
Last edited by Steve Ashton; 2nd January 22 at 07:42 PM.
-
The Following 2 Users say 'Aye' to Steve Ashton For This Useful Post:
-
4th January 22, 10:45 AM
#7
Thank you Steve,
I remember reading about your method before my original post. Thank you for explaining it a little further. It does look like a good method for maintaining consistency in the pleating process.
Thank you again,
Fyrbrd
-
-
8th January 22, 09:44 AM
#8
Question about canvas selection
Following up on my preparations; let me preface my question with, I have ordered heavyweight Hymo Canvas as recommended in TAoK.
As to my question, while picking up supplies at my local Joann's I looked to see what they had for canvas. Pickings were slim, but I was able to find a few bolts of natural cotton Duck Canvas. With Duck Canvas being a fairly firm cloth, would it be an acceptable substitute for Hymo Canvas?
Thanks,
Fyrbrd
-
-
8th January 22, 11:55 AM
#9
One of the reasons that we use the interfacing known by the brand name "Hymo" among others is that it has some properties that canvas does not.
While canvas is strong and stiff at first, after a few washings it will be just as soft and flexible as any other.
And canvas is usually made from Cotton or Hemp which have been known to rot over time.
The interfacing recommended is primarily a synthetic. And is stiffer in one direction than the other. So we install it with the stiffness in the vertical direction. This gives body and rigidity to the back of the kilt. It will stand up all on its own.

We do not install the interfacing as a single piece but create folds that allow it to take the curved shape and further enhance the vertical stiffness.
We then use a broadcloth fabric that is strong and has no stretch for the stabilizer. This forms a belt built inside the kilt. The straps and buckles are sewn completely though the outer Tartan fabric and are anchored to the stabilizer.
Can you use canvas? Well yes, it has been used in other kilts and it can often be found in older military kilts.
But here is what canvas can look like if not cared for.
And the result if it does fail.
Last edited by Steve Ashton; 8th January 22 at 12:04 PM.
-
The Following User Says 'Aye' to Steve Ashton For This Useful Post:
-
9th January 22, 06:53 PM
#10
JoAnns does not carry Hymo, nor Tailor's Cloth, which would be perfect. At least mine doesn't.
I order Pellon #HC110 Sew-In Hair Canvas Interfacing.
DunRovinStation.blogspot.com (non-monetized or affiliated)
Muir, MacKendrick-Henderson, Campbell, Clarke, Gordon, Cameron, Chattan,
Galt, Euen, Slowan(Sloan), Tyndings, Ramsey, Stewart, MacAlistar
-
 Posting Permissions
- You may not post new threads
- You may not post replies
- You may not post attachments
- You may not edit your posts
-
Forum Rules
|
|


Bookmarks