|
-
26th July 08, 09:09 PM
#1
In the middle of an X-Kilt, need some clarification. . .
Smack in the middle of creating my first X-Kilt, and a bit in the instructions that I figured "oh, it'll make sense when I get there" still doesn't make sense. . .
I've ironed in all the box pleats prior to bar-tacking. I've reached the left-hand edge of front apron and don't quite know how it should lie. I've topstitched the left edge of apron itself, on an "A-line," but am not sure where that edge lines up with last box pleat, and what becomes of the 11+ inches of material designated "reverse pleat."
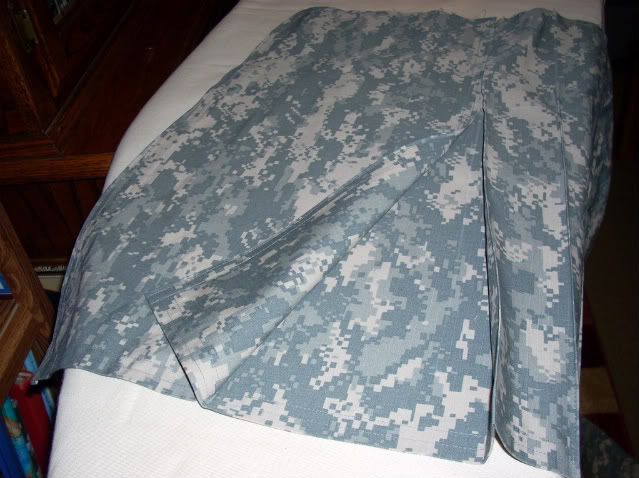
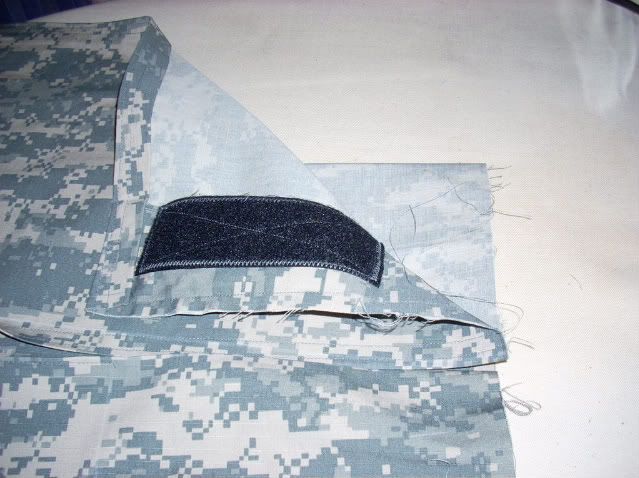
Photos show what I have ironed in so far -- left edge of apron aligns with first box pleat, with reverse pleat material all going forward beneath the front apron. But that puts the reverse pleat on top of my Velcro strip -- apron is 10 inches wide at top, Velcro is 6 inches long, reverse pleat is more than 4 inches deep at waistband so it overlaps the Velcro.
Instructions talk about "folding reverse pleat" but it's not clear to me whether I've folded it correctly (and just have too long a piece of Velcro) or if that reverse pleat material should be distributed in some other manner.
Hope this makes sense and that somebody who has been there/done that can offer advice! Thanks -- Sydnie
Lower edge showing over apron folded back to reveal reverse pleat, and first box pleat folded back to reveal its 1.5-inch depth

Upper edge showing how reverse pleat interferes with Velcro

-
-
27th July 08, 03:06 AM
#2
I have never been able to figure out the instructions for that side of the apron either.
However - to me it looks as thought the reverse pleat in your instructions is what I call the under apron pleat, which makes for easy climbing of steps, hills and vaulting of gates for me at least, and it also gives material to allow the aprons to fall modestly between the thighs when sitting.
There doesn't seem for there to be anywhere else for that pleat to go but where it is laid, and the Velcro has to go.
I would detach the Velcro and put the pleat under it.
Before you sew it, though, make sure that the pleat lies right when the kilt is being worn. For my kilts I have to raise the inner edge of the pleat so that it does not roll out from under the edge of the apron. Different kilts have different amounts of lifting - probably due to slight differences in where the outer edge hits the body.
I end up with a slender triangle of two fold fabric raised above the waistline - it is easily hidden in the waistband, and the edge of the apron stays neat.
I also find that the fabric folded at the waist to do the shaping of the edge of the apron has to be allowed to drop down below the waistline, or it tries to pull the lower edge of the apron narrower.
The inner edges of the aprons are the most fiddly part, but they only need some of logical thinking to get right. Or rather to get tho the point where you can start to experiment with solutions.
In most engineering, if it looks right, it is right.
Anne the Pleater
-
-
27th July 08, 05:19 AM
#3
Okay, I don't stitch the reverse pleat down until after I've sewn and tacked down the pleats and the fell. That allows me to get a better idea of how to align the pleat and the overapron. As for those 11", they turn into the reverse pleat, since you'll align the edge of your overapron next to the edge of your first pleat, creating a fold beneath the over apron.
Also, I don't put the velcro on until after that's all done and I'm ready to put the waistband on. That way I don't have to worry about all that stuff. I had to learn this after making my first x-kilt. So, you might want to take off the fabric with the velcro until later.
-
-
27th July 08, 07:50 AM
#4
Thanks for the replies. Seems I'm doing it right, just that the instructions are perhaps in the wrong order (reverse pleat first, Velcro second). I've already dealt with the conundrum of putting 2-inch Velcro onto 3-inch fabric strip while leaving a 1.25-inch gap  so deviating from printed instructions doesn't faze me too badly. so deviating from printed instructions doesn't faze me too badly.
FYI I'm a tech writer by trade so I know precisely how those things happen!
I'll get back to the camo X-Kilt later today, hope to finish it and post pix by this evening. All thanks to the great resource that is the people of XMTS!
P.S. I had already decided that I should have put the Velcro onto a double thickness of fabric (or else some heavier scrap) -- now's the time. So all's not lost.
-
Similar Threads
-
By Panache in forum General Kilt Talk
Replies: 35
Last Post: 27th June 08, 03:46 PM
-
By mdeesnuts in forum Kilt Board Newbie
Replies: 37
Last Post: 28th August 07, 07:52 PM
-
By Mike1 in forum Forum News
Replies: 0
Last Post: 30th January 07, 01:11 PM
-
By Kilted KT in forum Miscellaneous Forum
Replies: 20
Last Post: 1st December 06, 07:51 AM
-
By ozmeath in forum Miscellaneous Forum
Replies: 35
Last Post: 1st September 06, 09:21 PM
 Posting Permissions
- You may not post new threads
- You may not post replies
- You may not post attachments
- You may not edit your posts
-
Forum Rules
|
|


Bookmarks